Sometimes its useful to have the host of a virtual machine to be able to communicate directly with the virtual machine’s network.
Step 0 : Create the QEMU Bridge Configuration
Next lets create the qemu bridged configuration:
sudo pacman -S qemu
sudo nano /etc/qemu/bridge.conf
sudo chmod 755 -R /etc/qemu
Put the following inside
allow virbr0
sudo chmod u+s /usr/lib/qemu/qemu-bridge-helper
Next lets allow normal users to execute the qemu-bridge-helper
Step 1 : Install the prerequisites
Lets install the required packages
sudo pacman -S gnome-boxes virt-manager dnsmasq iptables iptables-nft
Note that if you cannot find one of the above packages its a good idea to update your mirrors (see: https://wiki.archlinux.org/title/mirrors)
Step 2 : Setup Lib-Virt Daemon
Lets enable the lib-virt daemon to auto-start
systemctl enable --now libvirtd
Next lets setup the kvm group so that it can manage the libvirtd
nano /etc/polkit-1/rules.d/50-libvirt.rules
Put the following inside
/* Allow users in kvm group to manage the libvirt
daemon without authentication */
polkit.addRule(function(action, subject) {
    if (action.id == "org.libvirt.unix.manage" &&
        subject.isInGroup("kvm")) {
            return polkit.Result.YES;
    }
});
Next lets create the libvirt group if it doesn’t exist already and add ourselves to it
groupadd libvirt
sudo gpasswd -a $(whoami) libvirt
Step 3 : Configure Networking
Next lets check the virsh interface status
sudo virsh net-list --all
If default exists then start it and set it up to autostart using:
sudo virsh net-start default
sudo virsh net-autostart default
If default doesn’t exist then do this first and then the previous:
sudo virsh net-define /usr/share/libvirt/networks/default.xml
Next start up virt-manager and connect to KVM/QEMU
Run ifconfig to see if things went well. If they do then you should have a virbr0 interface now:
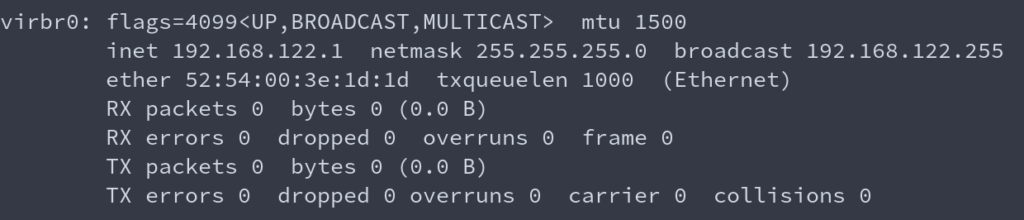
Now if you boot up the VM on gnome-boxes you should hopefully see an IP address on the same SUBNET.
I have tried entering the first three lines into the terminal and I am presented with a cursor display with bridge.conf with ‘allow virbr0’ displayed. I do not know how to progress from this state to the next stage of commands.
Hi There,
Thanks for this guide, I was wondering how do I make it so that VMs created in Gnome-Boxes get an IP on my host network so they can be accessed by other hosts on my network and each other ?
To make VMs in GNOME Boxes accessible on your host network (bridged networking), you’ll need to configure network bridging. GNOME Boxes uses libvirt/QEMU under the hood, so you’ll be working with those tools.
Here’s how to set this up:
## 1. Create a Network Bridge on Your Host
First, create a bridge interface that connects to your physical network:
**For NetworkManager (most modern distributions):**
“`bash
# Create the bridge
sudo nmcli connection add type bridge ifname br0
# Add your ethernet interface to the bridge (replace ‘eth0’ with your actual interface name)
sudo nmcli connection add type bridge-slave ifname eth0 master br0
# Bring up the bridge
sudo nmcli connection up bridge-br0
“`
**For netplan (Ubuntu Server):**
Edit `/etc/netplan/00-installer-config.yaml`:
“`yaml
network:
version: 2
renderer: networkd
ethernets:
eth0:
dhcp4: no
bridges:
br0:
interfaces: [eth0]
dhcp4: yes
parameters:
stp: false
“`
Then apply with `sudo netplan apply`.
## 2. Configure libvirt to Use the Bridge
Create a new network definition for libvirt:
“`bash
br0
# Create a network XML file
cat > ~/bridge-network.xml << EOF
EOF
# Define and start the network
sudo virsh net-define ~/bridge-network.xml
sudo virsh net-start br0
sudo virsh net-autostart br0
“`
## 3. Configure VMs to Use the Bridge
Unfortunately, GNOME Boxes doesn’t expose network configuration in its UI, so you’ll need to use `virsh` or `virt-manager`:
**Option A: Using virt-manager (GUI):**
1. Install virt-manager: `sudo apt install virt-manager` (or equivalent for your distro)
2. Open virt-manager and find your VM (it will show VMs created by GNOME Boxes)
3. Right-click the VM → Open → View → Details
4. Click on the NIC hardware
5. Change “Network source” to “Bridge device” and specify “br0”
**Option B: Using virsh (command line):**
“`bash
# List VMs
sudo virsh list –all
# Edit VM configuration (replace VM_NAME with your actual VM name)
sudo virsh edit VM_NAME
# Find the section and modify it to:
#
#
#
“`
## 4. Restart the VM
After making these changes, restart your VM. It should now receive an IP address from your network’s DHCP server (usually your router) and be accessible to other devices on your network.
## Alternative: macvtap (Simpler but with limitations)
If bridging seems complex, you can use macvtap mode instead:
“`bash
# List your VMs
sudo virsh list –all
# Attach a macvtap interface (replace VM_NAME and eth0 with your values)
sudo virsh attach-interface VM_NAME –type direct –source eth0 –model virtio –config
“`
The limitation with macvtap is that the host and guest cannot communicate directly with each other, but guests can communicate with other devices on the network.
## Notes:
– You may need to disable netfilter on the bridge for better performance:
“`bash
echo “net.bridge.bridge-nf-call-iptables = 0” | sudo tee -a /etc/sysctl.conf
sudo sysctl -p
“`
– If using Wi-Fi instead of Ethernet, bridging typically won’t work due to how Wi-Fi works at the driver level. You’d need to use NAT with port forwarding or macvtap instead.