Skip to content →

Category: Uncategorized

How to Use rclone to Create or Mount a Copy of Your ©Microsoft OneDrive

Recently I’ve been getting these emails from Microsoft saying that my OneDrive account is about to be frozen ( Apparently they decided to chop everyone’s storage down after the fact to 5GB and then charge people for the excess storage they’ve already used up thinking it was free /facepalm ).

Thing is that I’ve been so busy with Life especially with the Covid-19 pandemic going on that I really don’t care about sorting out my OneDrive right now.

That being said my home connection sucks, I mean it’s really bad.

On a good day I get about 5-6mbit/s down and at that rate it would take about 37 Hours to download my entire OneDrive storage to my local system, not to mention it would piss off everyone else who wants to use the internet in the house.

Then I thought why don’t I just transfer these files to my VPS since I have the excess storage anyways and my VPS’s connection is a much more palatable 100mbit/s+ down.

In comes obstacle one, OneDrive doesn’t officially support Linux, so we’ll be using rclone to connect and download our files instead.

Step 1:

First we need to install rclone

curl https://rclone.org/install.sh | sudo bash

Easy enough am I right?

Step 2:

We need to configure rclone to connect to our onedrive account so it can fetch and mount the files for us.

Thing is this process actually requires a web-browser for the authentication part, so you cannot do it easily via console. In my case I ended up installing VNC (for which you can check my tutorial below) and Firefox (via flatpak which I will post soon).

Run the configuration prompt and type new to create a new remote server configuration

root@oneserver:~# rclone config

2020/06/16 14:31:56 NOTICE: Config file "/root/.config/rclone/rclone.conf" not found - using defaults
No remotes found - make a new one
n) New remote
s) Set configuration password
q) Quit config
n/s/q> n

Next you’ll be asked what type of storage you wish to configure, in my case OneDrive was 23rd down the list but this may change in the future so be sure to check

Type of storage to configure.
Enter a string value. Press Enter for the default ("").
Choose a number from below, or type in your own value
 1 / 1Fichier
   \ "fichier"
 2 / Alias for an existing remote
   \ "alias"
 3 / Amazon Drive
   \ "amazon cloud drive"
 4 / Amazon S3 Compliant Storage Provider (AWS, Alibaba, Ceph, Digital Ocean, Dreamhost, IBM COS, Minio, etc)
   \ "s3"
 5 / Backblaze B2
   \ "b2"
 6 / Box
   \ "box"
 7 / Cache a remote
   \ "cache"
 8 / Citrix Sharefile
   \ "sharefile"
 9 / Dropbox
   \ "dropbox"
10 / Encrypt/Decrypt a remote
   \ "crypt"
11 / FTP Connection
   \ "ftp"
12 / Google Cloud Storage (this is not Google Drive)
   \ "google cloud storage"
13 / Google Drive
   \ "drive"
14 / Google Photos
   \ "google photos"
15 / Hubic
   \ "hubic"
16 / In memory object storage system.
   \ "memory"
17 / Jottacloud
   \ "jottacloud"
18 / Koofr
   \ "koofr"
19 / Local Disk
   \ "local"
20 / Mail.ru Cloud
   \ "mailru"
21 / Mega
   \ "mega"
22 / Microsoft Azure Blob Storage
   \ "azureblob"
23 / Microsoft OneDrive
   \ "onedrive"
24 / OpenDrive
   \ "opendrive"
25 / OpenStack Swift (Rackspace Cloud Files, Memset Memstore, OVH)
   \ "swift"
26 / Pcloud
   \ "pcloud"
27 / Put.io
   \ "putio"
28 / QingCloud Object Storage
   \ "qingstor"
29 / SSH/SFTP Connection
   \ "sftp"
30 / Sugarsync
   \ "sugarsync"
31 / Tardigrade Decentralized Cloud Storage
   \ "tardigrade"
32 / Transparently chunk/split large files
   \ "chunker"
33 / Union merges the contents of several upstream fs
   \ "union"
34 / Webdav
   \ "webdav"
35 / Yandex Disk
   \ "yandex"
36 / http Connection
   \ "http"
37 / premiumize.me
   \ "premiumizeme"
38 / seafile
   \ "seafile"
Storage> 23

Next you’ll be asked to enter Microsoft App Client Id and Secret, which we’ll ignore for now since we will be using the web authentication (just hit enter)

** See help for onedrive backend at: https://rclone.org/onedrive/ **

Microsoft App Client Id
Leave blank normally.
Enter a string value. Press Enter for the default ("").
client_id> 
Microsoft App Client Secret
Leave blank normally.
Enter a string value. Press Enter for the default ("").
client_secret> 

Next it will ask you if you wish to enter advanced configuration, hit no unless you have something special planned

Edit advanced config? (y/n)
y) Yes
n) No (default)
y/n> n

Now is when you’ll be asked if you would like to auto-configure, and for this step we type yes

Use auto config?
 * Say Y if not sure
 * Say N if you are working on a remote or headless machine
y) Yes (default)
n) No
y/n> y

Now is when either your browser will open up for you or you’ll have to manually go to the link (note that I wasn’t able to connect to this port remotely, so it may be that you have to open it locally), once you go there you’ll be asked to login to your Microsoft account and allow rclone a bunch of privileges it needs to do its thing

If your browser doesn't open automatically go to the following link: http://127.0.0.1:53682/auth?state=SECRETHERE
Log in and authorize rclone for access
Waiting for code...

Got code

Next we’ll be asked to describe exactly what type of account this is, which is a little redundant to be honest.. but well.. select 1 for OneDrive

Choose a number from below, or type in an existing value
 1 / OneDrive Personal or Business
   \ "onedrive"
 2 / Root Sharepoint site
   \ "sharepoint"
 3 / Type in driveID
   \ "driveid"
 4 / Type in SiteID
   \ "siteid"
 5 / Search a Sharepoint site
   \ "search"
Your choice> Your choice> 1

Next it will search for “drives” on the remote server, if you happen to have multiple drives you can pick which one. In my case I only have one so I select 0

Found 1 drives, please select the one you want to use:
0:  (personal) id=uniqueid834avsaf
Chose drive to use:> 0

Now it will ask you to confirm the root of the drive, just type yes

Found drive 'root' of type 'personal', URL: https://onedrive.live.com/?cid=uniqueid834avsaf
Is that okay?
y) Yes (default)
n) No
y/n> y

At this point it will ask you to confirm that the access token was set correctly, type yes again

[onedrive]
type = onedrive
token = {"access_token":"AWHOLEBUNCHOFSESSIONTOKENTEXTTHATYOUSHOULDNTSHAREWITHANYONE","expiry":"2020-06-16T15:40:51.775771327Z"}
drive_id = uniqueid834avsaf
drive_type = personal
--------------------
y) Yes this is OK (default)
e) Edit this remote
d) Delete this remote
y/e/d> y

Now that were done with the configuration we can type quit

Current remotes:

Name                 Type
====                 ====
onedrive             onedrive

e) Edit existing remote
n) New remote
d) Delete remote
r) Rename remote
c) Copy remote
s) Set configuration password
q) Quit config
e/n/d/r/c/s/q> q

Step 3:

Now lets create the folder we will mount this OneDrive to

mkdir ~/OneDrive

We need to decide what type of mounting we want, in this case we wish to have full read/write access to our files even if they disappear from the server so we use –vfs-cache-mode full

But there are many modes so be sure to check the documentation in case you don’t need a full copy (https://rclone.org/commands/rclone_mount/#file-caching)

rclone --vfs-cache-mode full mount onedrive: ~/OneDrive

And we’re done!

Now we can try to copy the files over to a local directory using a second SSH shell

mkdir ~/OneDriveBackup
cd ~/OneDrive
rsync -avzh --ignore-errors * ~/OneDriveBackup/

2 Comments

WireGuard VPN Server (Debian 9) and WireGuard VPN Client (Windows 10) Setup and Configuration

Wireguard is a next-generation open-source VPN connection protocol that claims to be faster and more secure than Open-VPN.

In this tutorial we will cover how to setup and configure a WireGuard VPN Server on a Debian Linux Distribution as well as how to get a Windows machine to route all traffic through that VPN using WireGuard’s Windows Client.

Step 0 : Install Un-Attended Updates

First, lets ensure we setup automated updates as we will want security patches and its likely that we wont be touching this VPS for a while.

apt-get install sudo
sudo apt-get install aptitude
sudo apt-get update && sudo apt-get upgrade 
sudo aptitude update -y && sudo aptitude install unattended-upgrades apt-listchanges -y
sudo dpkg-reconfigure -plow unattended-upgrades

Step 1 : Install WireGuard and Generate Keys

First lets edit our sources

sudo nano /etc/apt/sources.list.d/unstable.list

add the following line

deb http://deb.debian.org/debian/ unstable main

Open

sudo nano /etc/apt/preferences.d/limit-unstable

add the following lines

Package: *
Pin: release a=unstable
Pin-Priority: 150

Update your package lists and install WireGuard

sudo apt update
sudo apt install wireguard

Check that its loaded

lsmod | grep wireguard

Now lets ensure that IPv4 Forwarding is enabled

sudo nano  /etc/sysctl.conf 

Uncoment the following

net.ipv4.ip_forward=1

Now to save we need to

sudo sysctl -p

Now its time to generate your VPN’s private key

KEYS PROVIDED HERE ARE JUST EXAMPLES, DO NOT USE THEM AS THEY ARE PUBLIC AND INSECURE NOW

wg genkey

It’s important to write this down somewhere safe and private it’ll look something like this

uDXR7FnTzGarLNj+E3ePv4gOwsbjumZ7M9YjcKAQ8WI=

Now its time to generate the corresponding VPN’s public key using the private key we just generated

echo "uDXR7FnTzGarLNj+E3ePv4gOwsbjumZ7M9YjcKAQ8WI=" | wg pubkey

It’ll look something like this, write it down somewhere

9XIklpw4lGQ/I0S9L3gqTjwjJYsXJPluihomcCCrEzU=

Now its time to generate the User’s private and public key pair, note you will one for each user of the VPN (this essentially the same process as before)

wg genkey

Write down the User’s private key somewhere safe

0IoyeQyyWPYVGf4P4DosBGHHrl/T7k+2fqFc8JZRmGo=

Now lets generate the User’s public key

echo "0IoyeQyyWPYVGf4P4DosBGHHrl/T7k+2fqFc8JZRmGo=" | wg pubkey 

Write this down somewhere

JoYcG0Bq5+dMrEAc8eSTG6QCFBjwUWxfXTy7LWmhC0k=

Step 2 : Configuration of WireGuard Server

First we need to find our active interface

ip l

Will show something like

1: lo:  mtu 65536 qdisc noqueue state UNKNOWN mode DEFAULT group default qlen 1
    link/loopback 00:00:00:00:00:00 brd 00:00:00:00:00:00
2: eth0:  mtu 1500 qdisc pfifo_fast state UP mode DEFAULT group default qlen 1000
    link/ether  53:55:00:91:36:5c brd ff:ff:ff:ff:ff:ff

Here eth0 is our interface, now lets check our public IP address

ip a show dev eth0
2: eth0:  mtu 1500 qdisc pfifo_fast state UP group default qlen 1000
    link/ether 53:55:00:91:36:5c brd ff:ff:ff:ff:ff:ff
    inet 5.1.1.1/24 brd 5.188.238.255 scope global eth0
       valid_lft forever preferred_lft forever
    inet6 2103:90c0:186::20/48 scope global 
       valid_lft forever preferred_lft forever
    inet6 fe80::5058:ff:fe89:c66d/64 scope link 
       valid_lft forever preferred_lft forever

So here we can see our public IPv4 address is 5.1.1.1/24

Now lets create our configuration file

sudo nano /etc/wireguard/wg0s.conf

add the following, note where the User’s public/ VPN’s private keys go as well as our public IPv4 address and client’s public IPv4 address

[Interface]
Address = 5.1.1.1/24
PostUp = iptables -A FORWARD -i %i -j ACCEPT; iptables -A FORWARD -o %i -j ACCEPT; iptables -t nat -A POSTROUTING -o eth0 -j MASQUERADE
PostDown = iptables -D FORWARD -i %i -j ACCEPT; iptables -D FORWARD -o %i -j ACCEPT; iptables -t nat -D POSTROUTING -o eth0 -j MASQUERADEACCEPT; iptables -t nat -D PO$
ListenPort = 8081
PrivateKey = uDXR7FnTzGarLNj+E3ePv4gOwsbjumZ7M9YjcKAQ8WI=

[Peer]
PublicKey = JoYcG0Bq5+dMrEAc8eSTG6QCFBjwUWxfXTy7LWmhC0k=
AllowedIPs = 192.168.1.2/32 
PersistentKeepalive = 25

Now lets start it up

sudo wg-quick up wg0s

Check that it is running

wg show

You can terminate it if needed using

sudo wg-quick down wg0s

Step 3 : Setup and Configure Windows 10 WireGuard Client

First lets download and install the WireGuard Windows Client

https://www.wireguard.com/install/

In this tutorial we will be using Windows 10 64 bit so hit the button for downloading that version

Run through the installer and then open up the WireGuard Interface

Click Add Tunnel -> Add Empty Tunnel

Now add the following in, being careful to swap the keys with yours (note here we are providing the User’s Private Key followed by the VPN’s Public Key, and that the first Address is our local address)

[Interface]
Address = 192.168.1.2/24
ListenPort = 50001
PrivateKey = 0IoyeQyyWPYVGf4P4DosBGHHrl/T7k+2fqFc8JZRmGo=
[Peer]
PublicKey = 9XIklpw4lGQ/I0S9L3gqTjwjJYsXJPluihomcCCrEzU=
AllowedIPs = 0.0.0.0/0, ::/0
Endpoint = 5.1.1.1:8081
PersistentKeepalive = 25

Give it a name, Save and Activate

Now to check that it’s working head over to https://www.dnsleaktest.com/ on your Windows 10 machine and you should now see your VPN’s IP Address as if it were your own

NOTE: I’ve yet to get this working myself over the internet, certain ISPs may block this protocol and there may be some bugs yet. This information was compiled from various sources over the internet, use at your own discretion.

One Comment

Installation and Configuration of OpenLiteSpeed with PHP, MariaDB, LetsEncrypt SSL, PHPMyAdmin, and NinjaFirewall on Debian 10 Buster

Step 0 : Unattended Upgrades

The preparation step is to install unattended upgrades as an un-patched web-server is a really bad thing

sudo apt-get update && sudo apt-get upgrade
sudo apt-get install unattended-upgrades apt-listchanges

Now edit the following file:

sudo nano /etc/apt/apt.conf.d/50unattended-upgrades

Un-comment the line:

"origin=Debian,codename=${distro_codename}-updates";

And hit Ctrl+o and Ctrl+x to save and exit

Now to ensure /etc/apt/apt.conf.d/20auto-upgrades exists

dpkg-reconfigure -plow unattended-upgrades

Lets give it a test run to ensure things aren’t configured wrong

sudo unattended-upgrade -d

Step 1 : Install OpenLiteSpeed & MariaDB

First lets add the OpenLiteSpeed server to our a repository list in our Debian sources.list so we can get the latest version

wget -O - http://rpms.litespeedtech.com/debian/enable_lst_debain_repo.sh | bash

Now to install our packages (the nice thing is that OpenLiteSpeed now comes with PHP73 included)

sudo apt-get install openlitespeed mariadb-server
sudo apt-get install lsphp73-common lsphp73-curl lsphp73-imagick lsphp73-imap lsphp73-json lsphp73-memcached lsphp73-mysql lsphp73-opcache lsphp73-redis memcached lsphp73-intl

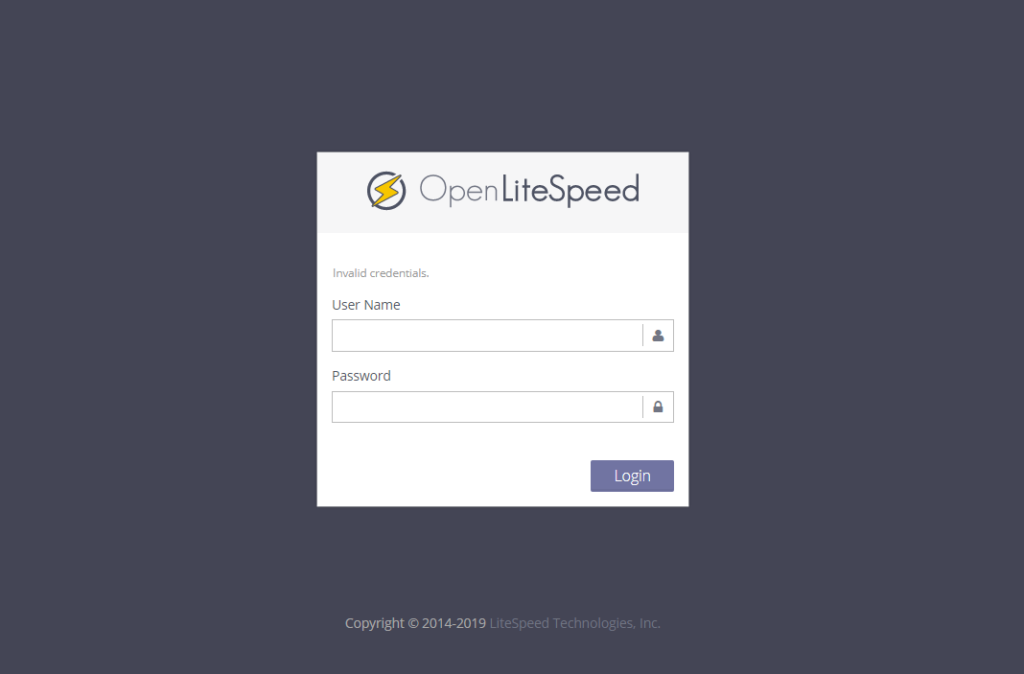
Lets ensure we can access the included WebAdmin GUI for OpenLiteSpeed by running the initial configuration script

sudo /usr/local/lsws/admin/misc/admpass.sh

You will be asked to set a username and password, set them to something secure and be sure to write them down somewhere so you don’t forget

Now you can load and access the GUI from a browser at any time wish:

SERVER_IP_ADDRESS:7080

Note: That you may encounter a certificate error on some chromium browsers, its okay to ignore this at this point, and proceed anyway if your browser allows it, otherwise use a different browser

Now lets do the initial configuration for MariaDB

sudo systemctl start mysql && sudo mysql_secure_installation

Important! You will be asked for the MySQL root password by default this is empty so just hit enter at this point

Now press “y” to set a secure MySQL root database password, then answer “y” to all the remaining questions (remember to write it down somewhere)

Step 2 : Configuring OpenLiteSpeed

Lets create the directory for a virtual domains and setup the directory structure in such a way that we can easily add more domains to our server in the future (remember to replace website.com with whatever your domain name is)

mkdir -p /var/www/website.com/{conf,logs,html}
cd /var/www
chown -R lsadm:lsadm *

Now ideally we’d want our configuration files to all be in /var/www/website.com/conf

For some silly reason OpenLiteSpeed wont allow that so we have to do a bit of a Linux trick to get make it think we are actually under its directory of /usr/local/lsws/conf/vhosts

Lets first delete the existing directory located there (note if you have existing configuration files from a previous install, be sure to back them up; by default only an Example configuration is here)

rm -rf  /usr/local/lsws/conf/vhosts 

Now lets use a symlink to link our /var/www/ to /usr/local/lsws/conf/vhosts

ln -s /var/www /usr/local/lsws/conf/vhosts

Lets go login to WebAdmin (again located at SERVER_IP_ADDRESS:7080)

Now click on Virtual Hosts – > + Sign to add a Virtual Host

Fill in the following details:

Virtual Host Name: website.com

Virtual Host Root: /var/www/$VH_NAME

Config File: $SERVER_ROOT/conf/vhosts/$VH_NAME/conf/vhconf.conf

Now hit save and you’ll get an input error, click the link to create the file

Ensure the following radio buttons are selected and hit save again

Now lets hit the green graceful restart button on the top right to get rid of this warning (note you will have to do this again every-time you update something in your configuration, i will only mention it this once but be sure you remember to do so)

Now hit the magnifying glass to view our configuration again and go to the General tab and edit the Document Root to $VH_ROOT/html and hit save again

Now hit Listeners on the left-hand navigation bar

Delete the default 8088 configuration as we wont be using it

Now create a new Listener in a similar fashion that we made the Virtual Host earlier

Well call this listener HTTP

Set it up to listen on port 80

HTTP isn’t a secure protocol, so we set Secure to No

Now save and create another Listener

Well call this listener HTTPS

Set it up to listen on port 443

HTTPS is a secure protocol, so we set Secure to Yes

Now we need to add Virtual Host Mapping to our listeners , first click add on Virtual Host Mappings

Next put the following values, and save

Virtual Host: website.com

Domains: website.com

This needs to repeated for the HTTPS Listener as well

Step 2.1 : Updating DNS Records

Ensure that both the A record for @ and www are pointing to your SERVER_IP_ADDRESS

Step 2.2 : Continuation of Configuration

Now if we head over to website.com in a browser we should get the following 404 error screen since we don’t have anything in our html folder yet

Congratulations if you’ve gotten to this point you’ve successfully configured your OpenLiteSpeed installation

Step 3 : SSL/HTTPS Configuration & Automation of LetsEncrypt

Important Note: This part of the guide is something you should do after creating all your Virtual Hosts for your domain names, as there is a verification step that will fail if your DNS isn’t properly configured

First install the certbot package, this will handle the certification generation for you.

sudo apt-get install certbot

Now use the following command to generate a certificate for each of your domain name(s) (remember to replace website.com with your domain name)

certbot certonly --webroot -w /var/www/website.com/html/ -d website.com -d www.website.com

Now enter your email address, and agree to the terms as needed

If all goes well you’ll get a Congratulations!

Note the following two file paths as they are important

Your certificate and chain have been saved at: /etc/letsencrypt/live/website.com/fullchain.pem
Your key file has been saved at:
/etc/letsencrypt/live/website.com/privkey.pem

Its time to configure our Virtual Host Configuration to utilize these, this time navigate to the SSL tab

Values to be set as follows:

TIP: You can use $VH_NAME in place of website.com but this trick wont work for the Listener section that is about to come

Private Key File :

/etc/letsencrypt/live/$VH_NAME/privkey.pem

Certificate File:

/etc/letsencrypt/live/$VH_NAME/fullchain.pem

Chain Certificate:

Yes

Now save and check all the Protocol Versions in the SSL Protocols section and save again

We do this to have broad compatibility with different browsers

Now we must repeat these steps for the HTTPS listener, as it will be the default mode (which then gets over-written by our specific Virtual Host Configuration)

Basically if no SSL certificate is found in the Virtual Host Configuration this one will be used

Currently it is mandatory to set this in OpenLiteSpeed

Note that here we cannot use $VH_NAME so we must use the domain name

Head over to https://website.com and now you should see a re-assuring SSL Lock indicator on the left which means everything was configured correctly

Optionally: Use this same Certificate and KeyFile for your OpenLiteSpeed WebAdmin (gets rid of the certificate error when using website.com:7080 instead of using SERVER_IP_ADDRESS:7080)

Now this certificate is only valid for next ~ 3 months, so to avoid an issue where users will get a certificate error in 4 months time, lets setup auto-renewal for our certificate(s)

First lets test that certbot is functioning correctly

sudo certbot renew --dry-run

Now assuming nothing went wrong lets create the cron-job to renew our certificates every month

sudo crontab -e

and add the lines

00 02 1 * * certbot renew >/dev/null 2>&1 
00 03 1 * * /usr/local/lsws/bin/lswsctrl restart

Step 4 : Installation of PHPMyAdmin

First head over to https://www.phpmyadmin.net/files/ and find the latest version number (for me this was 5.0.1) then download using

cd /var/www
wget https://files.phpmyadmin.net/phpMyAdmin/5.0.1/phpMyAdmin-5.0.1-all-languages.zip

Now we unzip, rename, and then delete the now un-needed zip file

sudo apt-get install unzip
unzip phpMyAdmin-5.0.1-all-languages.zip
mv phpMyAdmin-5.0.1-all-languages phpmyadmin
rm phpMyAdmin-5.0.1-all-languages.zip
chown -R lsadm:lsadm * 

Since we may want to access this same panel from various domains, lets create a symlink for our current domain instead of copying the folder over to the html folder

cd /var/www/website.com/html
ln -s /var/www/phpmyadmin phpmyadmin

Now lets configure it to use our MySQL root user

sudo mysql -u root
use mysql;
update user set plugin='' where User='root';
flush privileges;
\q

Some may tell you to create a separate user here for security reasons, but the fact is that phpmyadmin is most useful when run as root

We will address security concerns in the NinjaFirewall section

mv phpmyadmin/config.sample.inc.php phpmyadmin/config.inc.php
sudo nano phpmyadmin/config.inc.php

Now we need to generate a secret for the blowfish encryption, so just put any alphanumber character combination of length 32 here (May also grab one from https://www.random.org/strings/)

For example (DON’T USE THIS SAME STRING – MAKE YOUR OWN)

$cfg['blowfish_secret'] = 'csVH6hmV4_E5jNN7lVP8oWT_cY9avX_3'; /* YOU MUST FILL IN THIS FOR COOKIE AUTH! */

Now head over to https://website.com/phpmyadmin/index.php and login with your MySQL root user

Important Note: Avoid using phpmyadmin over HTTP as it is vulnerable to a man-in-the-middle attack

Step 5 : Installation and Configuration of NinjaFirewall

Ninja Firewall is a Freemium Model General PHP Application Firewall that is most excellent in my experience at preventing exploitation of PHP Applications on your server

Lets head over to the free-download

https://nintechnet.com/ninjafirewall/pro-edition/#download

The latest version at the time of writing is 4.0.3 so I’ll be using that

mkdir -p /var/www/fw
cd /var/www/fw
wget -O fw.zip https://nintechnet.com/ninjafirewall/pro-edition/?f=1
unzip fw.zip
rm fw.zip
chown -R lsadm:lsadm * 

Again for easy management we can create a symlink in our virtual host directory

cd /var/www/website.com/html
ln -s /var/www/fw fw

We also need to set the correct permissions

cd /var/www/fw
chmod -R 0777 conf
chmod -R 0777 nfwlog

Now lets head over to https://website.com/fw/install.php to start the installation

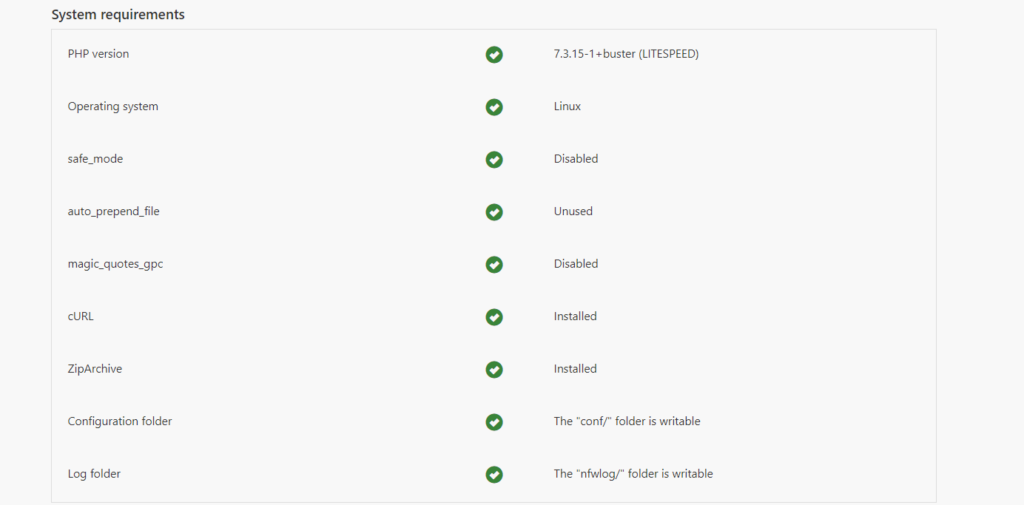
You may have an error telling us our PHP configuration doesn’t have cURL support and to install it even though you already did

In this case simply do a complete server restart since there is some configuration nonsense for lsphp that doesn’t update when just the OpenLiteSpeed service is restarted

sudo reboot

Now they should all be green

Now hit the next until you get to the the setting an administrator username and password (pick a secure user-password and record it somewhere safe)

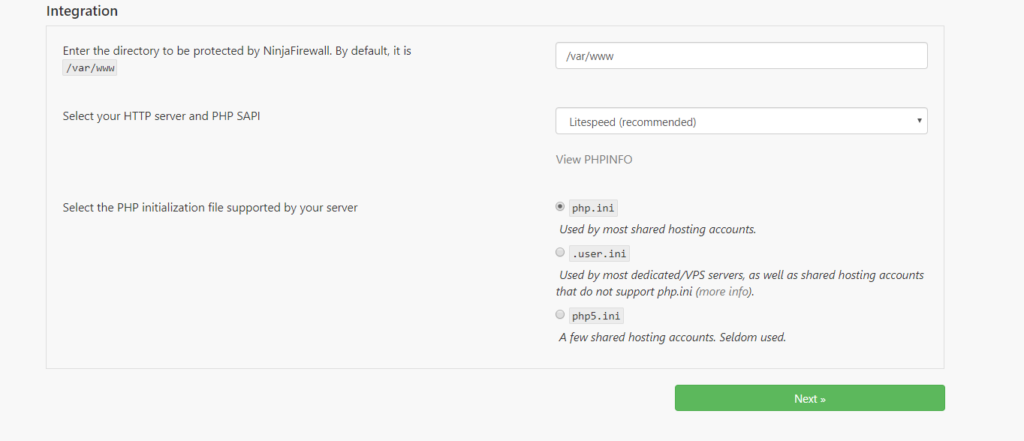
In the integration section, ensure the following is set

Protected Directory: /var/www

HTTP Server and PHP SAPI: Litespeed

Select the PHP Initialization file: php.ini

Now we need add our prepends accordingly

sudo nano  /var/www/.htaccess

Put

# BEGIN NinjaFirewall
php_value auto_prepend_file /var/www/fw/firewall.php
# END NinjaFirewall

and

sudo nano /usr/local/lsws/lsphp73/etc/php/7.3/litespeed/php.ini

Edit the existing auto_prepend_file = to

; Automatically add files before PHP document.
 ; http://php.net/auto-prepend-file
 auto_prepend_file = /var/www/fw/firewall.php

Save and restart the OpenLiteSpeed server using

pkill lsphp
/etc/init.d/lsws restart

Then select next on the installer and hopefully you get no errors 🙂

Lastly we need to make our config file writable

chmod 0777 /var/www/fw/conf/options.php

You can now login and manage your Ninja Firewall at https://website.com/fw/ note should you have any issues installing/using applications later on, it is highly advised to check the firewall logs first!

Step 6 : Some Final Tweaks

It is a good idea to force HTTPS on your domains to ensure your login information isn’t snooped on

Lets go to the virtual host configuration again, this time on the Rewrite tab and do the following

Enable Rewrite : Yes

Auto Load from .htaccess : Yes (This setting will help with installation scripts later)

Rewrite Rules:

rewriteCond %{HTTPS} !on
rewriteCond %{HTTP:X-Forwarded-Proto} !https
rewriteRule ^(.*)$ https://%{SERVER_NAME}%{REQUEST_URI} [R,L]

Now we should probably setup OpenLiteSpeed itself to automatically update

However since the current update script messes with some package defaults, we need to make some explicit edits to the configuration

sudo nano /usr/local/lsws/conf/httpd_config.conf

Ensure the following 2 lines are set to lsadm and save

user                      lsadm
group                     lsadm

Now we need to add the update script to our cronab

sudo crontab -e

Add the following line, which will run the official update script daily

30 2 * * * /usr/local/lsws/admin/misc/lsup.sh

That’s it! My longest tutorial in quite a while. Hope this helps.

2 Comments

Getting XIDU PhilBook Max to Play Nice with Linux

This notebook uses a misidentified SYNA3602 ; which in actuality is likely a Hantick Touchpad.

Problem One – Non-Working TouchPad

The first problem is that the i2c_hid portion of the Linux kernel expects this device to throw an interrupt after being reset, which it doesn’t do.

So for example in Clear Linux there may be failure to reset touchpad error messages.

Apparently this was patched later, pushed upstream and yet somehow is still breaking after reboots.

So in order to get a touchpad that is working between reboots you need to build/install the following package (note here I’m using Manjaro, but the code is simple enough you can build your own script for in other distros fairly easily):

https://gitlab.manjaro.org/packages/community/mhwd-i2c-syna3602

This will usually get the touchpad to start working after a reboot (wait for the service to run before presuming it didn’t work).

To build and install under Manjoro:

pacman -S base-devel
makepkg -si

and be sure to Reboot

Important Note:

If your touchpad(or even the touchscreen) wasn’t working before, this may not fix it.

That’s because the touchpad, and even the touchscreen can lock-up completely if they are improperly initialized by Linux. Something to do with voltage spike maybe? I’m not sure.

In this scenario the only solution I’ve found is to install Windows 10 and then install the proper driver pack, reboot and then install Linux (a real pain to be sure). However to minimize this pain you can use Rufus to install Windows 10 onto a USB drive and then boot it as a Live-USB, which can help avoid the whole re-installing Linux part.

After booting Windows 10 (with the proper driver pack installed) the touchpad and the touchscreen should resume working in Linux. You can actually repeat this as necessary until you get a working installation in which case I highly recommend getting a full system image backup.

Note: It’s a good idea to disable driver updates in Administrative Templates in Windows if you plan on doing this, otherwise Windows may override your good drivers with bad ones from Windows Update.

Problem Two – The Touchscreen Rotation Issues

First lets install the sensor proxy :

sudo pacman -S iio-sensor-proxy

Next lets install the build requirements for GuLinux’s ScreenRotator (https://github.com/GuLinux/ScreenRotator)

sudo pacman -S base-devel qt5-declarative qtcreator qt5-sensors cmake git clang 

Next lets build it..

git clone https://github.com/GuLinux/ScreenRotator
mkdir ScreenRotator/build
cd ScreenRotator/build

but wait there is a problem

The orientations used do not match the Goodix TouchScreen orientations matrix.

If we build and run as is we will have the screen oriented in the wrong direction as we turn it around. Specifically the following needs to be interchanged:

RightUp <==> TopUp 
LeftUp <==> TopDown

So lets be sure to update the /src/orientationsensor.cpp accordingly.

Specifically change this:

d->to_orientation = {
    { QOrientationReading::TopUp, TopUp },
    { QOrientationReading::TopDown, TopDown },
    { QOrientationReading::RightUp, RightUp },
    { QOrientationReading::LeftUp, LeftUp },
  };

to this:

d->to_orientation = {
    { QOrientationReading::TopUp, RightUp },
    { QOrientationReading::TopDown, LeftUp },
    { QOrientationReading::RightUp, TopUp },
    { QOrientationReading::LeftUp, TopDown },
  };
cmake ..
make all
sudo make install

Now you just need to run the Screen Rotator located at /usr/local/bin/screenrotator

Alternatively you can reboot as this should start up with Linux on the next boot.

And now both the touchpad and touchscreen should be usable, I hope this helped you as it took me almost 2 work days to get this to behave correctly.

Leave a Comment

How to set up a remote desktop session on Debian Linux via VNC (tightvncserver)

Sometimes it is necessary to have a graphical user environment on a remote machine. Windows server instances can sometimes be too expensive for the given usage scenario. This guide will walk through the process of setting a remote desktop environment on Debian Linux.

Optionally install sudo

 apt-get install sudo

Update your apt-cache and packages using

sudo apt-get update && sudo apt-get upgrade

Install the following packages for a smooth desktop environment

sudo apt install xfce4 xfce4-goodies xorg dbus-x11 x11-xserver-utils gnome-icon-theme gnome-panel metacity nautilus gnome-settings-daemon

To enable copy-paste functionality please also install

sudo apt install autocutsel

Now to create a VNC specific user, as some applications like Google Chrome may by default refuse to run under root

adduser vncuser

Optionally you may wish to remove the restriction on password-complexity for your system as at times it can enforce a set of password restrictions that are not compatible with our version of VNC

nano /etc/pam.d/common-password

Remove enforce_for_root

Now we need to add the new user to sudoers group

gpasswd -a vncuser sudo

Install TightVNCServer (I will avoid TigerVNC, and Vnc4Server for now as they both have their respective issues)

sudo apt-get install tightvncserver

Start the VNC server using the following command

vncserver

Now to setup both a regular password as well as a view-only password

Let’s kill the server using the following command

vncserver -kill :1

At this point we’ll want to do the same for our created user so

su vncuser
vncserver
vncserver -kill :1

Setup both passwords again for vncuser this time and kill it as we did last time

Either upload or via your favorite text editor create the files /root/.vnc/xstartup and /home/vncuser/.vnc/xstartup and add the following contents whilst ensuring that the files are owned by their respective users

#!/bin/sh
#Uncomment the following two lines for normal desktop:
unset SESSION_MANAGER
#exec /etc/X11/xinit/xinitrc
unset DBUS_SESSION_BUS_ADDRESS
#Uncomment this line to enable copy-paste (note that VNC is not secure by itself!)
#autocutsel -fork &
startxfce4 &
[ -x /etc/vnc/xstartup ] && exec /etc/vnc/xstartup
[ -r $HOME/.Xresources ] && xrdb $HOME/.Xresources
xsetroot -solid grey
vncconfig -iconic &
gnome-panel &
gnome-settings-daemon &
metacity &
nautilus &
gnome-terminal &
exec /home/vncuser/autostart/startup.sh

Note that if you want to make anything start up with the system simply place it into /home/vncuser/autostart/startup.sh

Now to make VNC server a system service, first create the directory for the config files

mkdir /etc/vncserver

Now upload or edit in the following as the file /etc/vncserver/vncservers.conf

VNCSERVERS="1:root 2:vncuser"
VNCSERVERARGS[1]="-geometry 1920x1080 -depth 24"
VNCSERVERARGS[2]="-geometry 1920x1080 -depth 24"

Now to create the actual service, upload or edit in the following as the file /etc/init.d/vncserver

#!/bin/bash

### BEGIN INIT INFO
# Provides:		vncserver
# Required-Start:	$remote_fs $syslog
# Required-Stop:	$remote_fs $syslog
# Default-Start:	2 3 4 5
# Default-Stop:		
# Short-Description:	VNC Service for Remote Desktop
### END INIT INFO

unset VNCSERVERARGS
VNCSERVERS=""
[ -f /etc/vncserver/vncservers.conf ] && . /etc/vncserver/vncservers.conf
prog=$"VNC server"

start() {
        . /lib/lsb/init-functions
        REQ_USER=$2
        echo -n $"Starting $prog: "
        ulimit -S -c 0 >/dev/null 2>&1
        RETVAL=0
        for display in ${VNCSERVERS}
        do
                export USER="${display##*:}"
                if test -z "${REQ_USER}" -o "${REQ_USER}" == ${USER} ; then
                        echo -n "${display} "
                        unset BASH_ENV ENV
                        DISP="${display%%:*}"
                        export VNCUSERARGS="${VNCSERVERARGS[${DISP}]}"
                        sudo -u ${USER} -H sh -c "cd ~${USER} && [ -f .vnc/passwd ] && vncserver :${DISP} ${VNCUSERARGS}"
                fi
        done
}

stop() {
        . /lib/lsb/init-functions
        REQ_USER=$2
        echo -n $"Shutting down VNCServer: "
        for display in ${VNCSERVERS}
        do
                export USER="${display##*:}"
                if test -z "${REQ_USER}" -o "${REQ_USER}" == ${USER} ; then
                        echo -n "${display} "
                        unset BASH_ENV ENV
                        export USER="${display##*:}"
                        su ${USER} -c "vncserver -kill :${display%%:*}" >/dev/null 2>&1
                fi
        done
        echo -e "\n"
        echo "VNCServer Stopped"
}

case "$1" in
start)
start $@
;;
stop)
stop $@
;;
restart|reload)
stop $@
sleep 3
start $@
;;
condrestart)
if [ -f /var/lock/subsys/vncserver ]; then
stop $@
sleep 3
start $@
fi
;;
status)
status Xvnc
;;
*)
echo $"Usage: $0 {start|stop|restart|condrestart|status}"
exit 1
esac

Now to make the service executable, add it the startup and start it

sudo chmod +x /etc/init.d/vncserver
sudo update-rc.d vncserver defaults
sudo update-rc.d vncserver enable
sudo service vncserver start

Congratulations! You should now have a working VNC server and you can test it by connecting to the default VNC port and :1 :2 respectively. (eg: SERVER-IP:2 will connect you to vncuser‘s desktop)

A few important notes:

VNC is unencrypted by default and vulnerable to a man-in-the-middle attack (that means don’t send any important data over the link because it will be open for viewing to the public internet).

If you wish to make it secure you may need to tunnel using either OpenSSH/VPN/SOCKS5 or any other kind of tunneling.

A simple way to is to tunnel over SSH, this can be done on any Linux client by doing the following (where the 1 in the 5901 refers to the desktop number eg 1 for root, 2 for vncuser in our example):

ssh -L 5901:localhost:5901 USER@REMOTE_IP

Now in order to connect to VNC you just need to point your VNC client to localhost:5901 and you will automatically be tunneled over ssh to your Remote IP!

Should you want to change the port VNC is running on (which I highly recommend unless you want to get spammed with bad logins by IP scanners), please change the following file on the line indicated by the command (and restart):

grep -n vncPort /usr/bin/vncserver

If you’re using Linux on your client machines; there is a far better alternative to VNC called
X2Go that you may wish to look into.

One Comment

PeerBlock 1.1 updated to allow HTTPs link downloads

Peerblock is a firewall application that acts to filter out communications between your system and a remote IP. Though being abandoned to my knowledge since 2014-2015 it still functions well and fills a niche roll as a customizable IP-Table that has automated remote update functionality as well as an easy way to enable and disable.

Some of you may remember this application as it was widely used back in the early days of P2P software though it has since fallen to relative obscurity.

I recently found it useful for my current needs, however it seems that it was built without the necessary SSL capability enabled in its version of libcurl. Essentially it could only update using HTTP links not HTTPs links.

I’ve taken the liberty to build the latest revision again but this time with an updated libcurl that allows the usage of HTTPs links for downloading.

This modified version can be downloaded here:

https://mega.nz/#!fEtkVCDY!F88T4MEAOxHmHGO8kA2lpoXZsQfKxEAO1ZQZfmytUIs
One Comment